
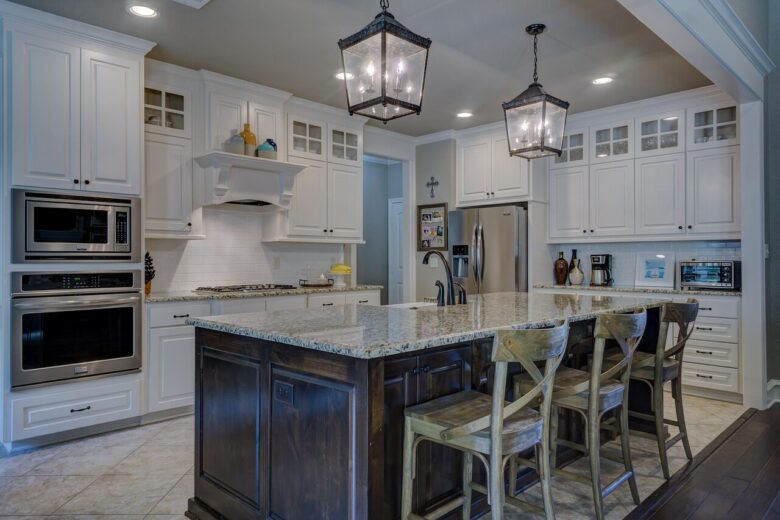
What if an open-concept home looks elegant by day but feels disjointed the moment the lights come on?
In luxury interiors, lighting does more than provide illumination. It defines activity areas, supports visual comfort, highlights finishes and artwork, and changes how one continuous space feels throughout the day. A great room may need to support food preparation, dining, conversation, television viewing, and nighttime circulation without covering the walls in controls.
Multi-zone smart lighting addresses this challenge by coordinating separate fixture groups through scenes, sensors, schedules, keypads, and other controls. The goal is not to add technology for its own sake. It is to make every zone useful on its own while preserving a coherent atmosphere across the wider room.
This guide explains how to map zones, select a suitable control architecture, build practical scenes, avoid compatibility problems, and commission the finished system for the actual home.
What Defines a Multi-Zone Smart Lighting Scene?
A multi-zone scene is a coordinated preset in which different areas and lighting layers receive different commands. A cooking scene might raise countertop and island lighting while keeping the lounge restrained. A dining scene could dim kitchen downlights, lower the chandelier output, illuminate artwork, and reduce glare near adjacent glazing.
The important distinction is control by function and sightline, not simply by room name. An open floor plan may contain several activities within one architectural volume, so placing every fixture on one dimmer usually produces a result that is either too bright for relaxing or inadequate for tasks.
- Task zones: Countertops, islands, bars, desks, reading chairs, and other locations where clear visibility matters.
- Ambient zones: Recessed lights, coves, decorative fixtures, and indirect sources that establish the general brightness of the space.
- Accent zones: Art lights, wall washers, shelf lighting, and concealed linear LEDs used to emphasize materials or architecture.
- Circulation zones: Entries, passages, stair approaches, and routes connecting one activity area to another.
A successful scene creates a hierarchy among these layers. It does not necessarily turn every available fixture on. Subtle differences in brightness, direction, and emphasis often define zones more effectively than dramatic color changes.
Choose the Right Control Architecture Before Designing Scenes
Lutron HomeWorks, Control4, and Philips Hue can all participate in lighting scenes, but they are not interchangeable product categories. Their system architecture, supported loads, commissioning process, capacity, and approach to reliability differ substantially.
| Platform | What it is | Where it can fit | Important planning considerations |
|---|---|---|---|
| Lutron HomeWorks | A dedicated whole-home lighting and shade control system designed and programmed for sophisticated residential projects. | Large renovations and new builds requiring coordinated dimming, keypads, shades, schedules, daylight-related automation, and broader integration. | Load types, circuits, panels, keypads, shade interfaces, and programming should be coordinated early with the qualified system provider and electrical team. |
| Control4 | A broader home-automation platform that can coordinate lighting with shades, climate, entertainment, locks, and other supported systems. | Homes where unified automation and cross-system scenes are as important as lighting control. | Actual lighting performance depends on the Control4 products and third-party devices being integrated. Responsibilities for lighting programming and wider automation should be documented. |
| Philips Hue | A hub-based smart-lamp and fixture ecosystem using Zigbee mesh networking through the Hue Bridge. | Retrofits, decorative lighting, tunable lamps, selected rooms, and projects where replacing individual lamps or fixtures is practical. | Philips specifies the standard Hue Bridge for up to 50 lights and 12 accessories. Larger properties may need a higher-capacity Bridge Pro or multiple bridges, and some automations or voice functions may remain limited to devices on one bridge. |
System selection should therefore begin with the fixture schedule and expected scale—not the app interface alone. Consider the number and type of loads, wired and wireless coverage, keypad requirements, local control during an internet outage, integration responsibilities, future serviceability, and who will commission changes after handover.
How to Map Lighting Zones Across an Open Floor Plan
Start with a floor plan showing furniture, millwork, artwork, windows, circulation routes, and likely activities. Then identify which lighting layers need to change independently. Fixture location alone is not a sufficient reason to place two lights on the same control zone.
Kitchen
Separate task lighting from decorative and background lighting. Under-cabinet LEDs, island pendants, downlights, display cabinets, and toe-kick lighting may need different behavior during cooking, cleaning, dining, and late-night use.
Dining area
The chandelier or pendants should usually be independent from kitchen downlights, even when the spaces are adjacent. Perimeter lighting, artwork lighting, and buffet or cabinetry lighting may form additional zones if they contribute meaningfully to dining scenes.
Living and media areas
Separate general illumination from wall washers, table and floor lamps, joinery lighting, and media-adjacent fixtures. For television viewing, prioritize glare control and reflected-light management rather than simply reducing every fixture to the same level.
Transition areas
Entries, hallways, and stair approaches should connect scenes without creating abrupt pools of brightness. Low-level lighting or carefully aimed fixtures can support nighttime visibility, but a motion-controlled scene should not be treated as proof of code-compliant stairway, hallway, or egress lighting. Requirements vary by jurisdiction and must be confirmed for the property.
Before combining fixtures on one zone, ask:
- Will these lights always need to brighten and dim together?
- Do they use compatible load types, drivers, and dimming methods?
- Do they share the same fixed color temperature or tuning behavior?
- Could one fixture cause glare while another still needs useful output?
- Will furniture, artwork, or room use change later?
- Does the chosen system have enough circuit, device, bridge, and network capacity?
Create a Control Schedule, Not Just a Fixture Plan
A fixture plan shows where lights are located. A control schedule explains how each load operates and who is responsible for making it work. For a high-end installation, document at least the following:
| Schedule item | What to record |
|---|---|
| Zone and circuit | A unique identifier, circuit assignment, fixture locations, and connected wattage. |
| Light source and driver | Lamp or LED module, driver model, control protocol, and manufacturer-approved dimming method. |
| Visual characteristics | Nominal color temperature, color-tuning capability, beam distribution, and other specified color-quality requirements. |
| Control behavior | Minimum usable dim level, keypad buttons, sensors, schedules, shade dependencies, and scene membership. |
| Integration responsibility | Which electrician, lighting-control dealer, automation integrator, or other party supplies, installs, addresses, programs, and commissions each component. |
This documentation improves coordination and future serviceability, but it does not guarantee a particular project cost or financial return. The specification still needs to be verified against current manufacturer documentation and the actual electrical design.
How to Build Scenes That Feel Natural
Begin with a small set of scenes tied to recognizable activities. Too many presets with only minor differences make keypads and apps harder to understand. A practical starting set might include:
| Scene | Typical priorities |
|---|---|
| Arrival | Comfortable entry and circulation lighting, selected architectural accents, and enough illumination to orient occupants without activating every fixture. |
| Cooking | Strong countertop and island task lighting, useful ambient light, and restrained adjacent lounge lighting. |
| Dining | A dimmed chandelier or pendants, reduced kitchen brightness, controlled glare, and selected artwork or cabinetry accents. |
| Entertaining | Balanced brightness across conversation areas, serving locations, circulation routes, and architectural features. |
| Media | Low-glare background illumination, subdued downlights near the screen, and enough peripheral light for comfortable movement. |
| Night path | Restrained circulation lighting with sensible sensor timing and manual override where appropriate. |
Do not treat commanded percentages as transferable lighting targets. A setting of 20% or 40% can look very different from one circuit to another because dimming curves, driver behavior, fixture output, surfaces, beam distribution, and visual adaptation all affect the result. Use initial values only as programming placeholders, then commission each zone visually and, where task performance matters, with appropriate lighting calculations or measurements.
A “Dinner” scene, for example, could dim the chandelier, reduce kitchen downlights to a background level, retain useful serving light, and illuminate selected artwork. If the design calls for the chandelier to become warmer as it dims, the lamp, fixture, and driver must expressly support warm-dim or another color-tunable method. A conventional dimmer connected to a fixed-CCT LED normally changes output, not color temperature.
Coordinate Color Temperature Without Forcing Uniformity
Lower correlated color temperature values, such as 2700–3000K, generally appear warmer, while 4000K and above generally appear cooler. However, mixing these values is not automatically a design error. Different color temperatures can intentionally distinguish food preparation, decorative lighting, art, or daytime-oriented tasks.
The problem is unplanned inconsistency. Adjacent downlights with visibly different warmth or tint can make a carefully finished ceiling look uneven. Nominal CCT also does not fully describe color rendering, tint, beam quality, or consistency between products, so samples and mock-ups are valuable when several manufacturers or fixture families share a sightline.
For dynamic scenes, specify whether each source is fixed-CCT, warm-dim, tunable-white, or full-color. These technologies behave differently and should not be assumed to match automatically. More information about planning time-based color changes is available in our guide to circadian-rhythm lighting for home productivity.
Coordinate Sensors, Daylight, Shades, and Manual Control
Occupancy sensing and daylight-responsive controls can reduce unnecessary lighting when they switch off or lower output that is not needed. Actual energy savings vary with occupancy, baseline use, available daylight, sensor placement, time delays, and commissioning. Evidence from commercial and institutional buildings should not be converted into a guaranteed residential savings or payback claim.
In an open-concept home, sensors also need to account for seated or quiet occupants. A sensor that works well in a kitchen may switch off too quickly over a dining table or reading area. Confirm detection coverage, timeout behavior, daylight thresholds, and manual override during commissioning.
Motorized shades can complement lighting scenes by controlling glare and daylight. Decide whether a scene should move shades automatically, offer a separate shade command, or leave them unchanged. Unexpected shade movement can be distracting, so automation should remain predictable and easy to override.
Daily functions should not depend solely on a phone or voice assistant. Clearly labeled or engraved keypads at entrances and activity areas provide immediate control, while apps and voice commands can handle secondary functions. Where the platform permits, review how essential local controls behave if internet access or an external service is unavailable.
Common Multi-Zone Lighting Mistakes
- Using one zone for an entire open room: Cooking, dining, relaxing, and circulation rarely require the same output at the same time.
- Creating too many similar scenes: “Dinner,” “Relax,” “Evening,” and “Entertain” are only useful if occupants can understand the difference.
- Relying on copied percentages: Scene values from another property do not establish suitable brightness in a different installation.
- Ignoring LED and dimmer compatibility: An unsuitable lamp, driver, or dimmer combination can cause flicker, hum, drop-out, restricted range, or unstable low-end performance.
- Assuming every LED can change color temperature: Fixed-CCT products dim without necessarily becoming warmer.
- Mixing products without visual coordination: Matching nominal CCT labels may still produce differences in tint, output, beam, and dimming behavior.
- Underlighting tasks: Attractive ambience does not compensate for inadequate countertop, serving, reading, or cleaning light.
- Forgetting scale and network limits: Device counts, bridge capacity, wireless coverage, and cross-system dependencies should be resolved before equipment is ordered.
- Leaving programming until the end: Scene intent, keypad locations, button labels, sensor behavior, and integration responsibilities should be planned alongside the electrical work.
Compatibility should be checked against manufacturer data for the exact lamp, driver, fixture, and control combination. Where practical, test representative products before final specification. Electrical connections, panel work, and permanently installed controls are tasks for appropriately qualified professionals in accordance with product listings, instructions, permits, and locally adopted codes.
Commission the System in the Finished Space
Scene programming should be completed after major finishes, furniture, artwork, and window treatments are in place because these elements change reflections, contrast, and perceived brightness. Review the system during both daylight and nighttime conditions.
- Verify every load: Confirm circuit identity, correct control direction, stable operation, and expected response from keypads and apps.
- Set the usable dimming range: Look for flicker, shimmer, hum, delayed start, drop-out, or abrupt changes near the low end.
- Balance adjacent zones: Adjust brightness and glare while standing and sitting at the main activity points.
- Tune scenes by purpose: Keep task surfaces readable while reducing unnecessary background output.
- Review sensors and schedules: Check detection zones, timeouts, daylight thresholds, after-hours behavior, and manual overrides.
- Confirm interfaces: Make keypad labels clear, reserve voice control for commands that are easy to remember, and remove redundant scenes.
- Record the final configuration: Retain load schedules, device information, scene names, programming backups where supported, and service contacts.
Practical Takeaway
The best multi-zone lighting plan is not the most complicated one. It is the plan that makes each activity area feel intentional while keeping the wider open space visually connected.
Map zones around tasks and sightlines, select a platform that suits the project’s scale and architecture, verify every dimmer and LED combination, and treat scene percentages as adjustable starting points rather than universal settings. Finally, commission the system in the completed home so glare, color consistency, sensor behavior, keypad logic, and transitions can be evaluated under real daytime and nighttime conditions.
Sources and references
- Lutron: HomeWorks home automation and lighting system
- Control4: Using lighting scenes
- Philips Hue: What is the Hue Bridge? and How many Hue Bridges do I need?
- ENERGY STAR: Dimming LED lights and compatibility considerations
- U.S. Department of Energy: Understanding LED color-tunable products
- Lawrence Berkeley National Laboratory: Occupancy- and time-based lighting controls
- National Fire Protection Association: National Electrical Code report
The MiraGuard Home Editorial Team creates practical educational content about smart home automation, residential security, connected lighting, energy-efficient design, sustainable building practices, and everyday home technology. Our articles are prepared using manufacturer documentation, official product resources, public safety guidance, recognized technical references, and reputable industry publications. MiraGuard Home does not provide engineering evaluations, electrical services, architectural plans, security guarantees, or property-specific installation advice. Electrical, structural, high-voltage, and permit-related work should be handled by appropriately qualified professionals when required.